computer science tutorial
seminar topic
newidea
computer science engineering
power of computer
magic of computer
computerinformation
You have two choices, a single Operating System (OS) or a multi-boot system.
Many desktop users like to run Linux in addition to Windows on an existing PC. An additional hard drive may be used for Linux or an existing drive may be sectioned into two or more partitions. Linux may also reside as the only operating system on the computer as is preferred by those creating a server. Using a separate drive for Linux is the easiest and the preferred multi-boot configuration because it allows the original Windows drive to remain intact.
Another dual boot system option is to install the Linux boot loader on a floppy or CD. See the YoLinux.com tutorial on creating a boot floppy The boot process will be controlled by the MS/Windows boot loader. In order to boot the Linux drive, insert the floppy or CD with the Linux boot loader (Lilo or Grub) and boot from the floppy or CD. The Linux boot loader can be installed on the MBR of the floppy.
Note: Re-partitioning a drive will destroy all data on the drive unless a tool such as partition magic or fips is used. The Red Hat CD-ROM includes the repartitioning tool "fips" in the dosutils directory. See /dosutils/fipsdocs. This tool is unsupported. Partition Magic would be a wiser choice for those pursuing this approach. For dual boot installations, MS/Windows can be re-installed allowing the Microsoft installer to repartition the drive.
For those creating a dual boot system with Microsoft Windows and versions of Fedora Core or Red Hat Linux (8/9) with the GRUB boot loader, install Windows first and then let the Linux installation handle the dual boot configuration. It's that easy.
Details: When creating a dual boot system with Windows NT or Windows 2000, the NT loader resides on the Master Boot Record (MBR). Upon boot-up, the NT loader is activated and then it loads lilo or Grub to boot Linux. (Lilo is the older Linux boot loader. Red Hat 7.2 introduced Grub as the default boot loader.) In this instance, lilo (or Grub) does not reside on the Master Boot Record (MBR) as it would for a Windows 95 or Linux only installation. Instead lilo (or Grub) will install on the first sector of the root partition. See: LDP: NT Loader HOWTO
Upgrades: I have been upgrading versions of Red Hat since 5.2. Each release can upgrade to the next. Fedora Core is the upgrade path to Red Hat 9.0.
| Hardware considerations: |
The latest releases of the Linux kernel will have the best chance at supporting newer hardware. Older versions may require downloading drivers separately and introducing them during install. Thus the latest release of Fedora Core will have the best chance of supporting the latest graphics cards and SATA chipsets. Other Linux OSs which tend to include the latest kernels and thus the latest hardware support, are SuSE and Ubuntu Linux.
Most PC motherboard support two IDE connectors, a primary and a secondary. Each IDE connector has a ribbon cable which can support two devices. A typical PC with one hard drive and one CD-ROM can thus support two more devices. A jumper on the device will set the device to be either the master or slave device on that IDE connection. (You can't have both devices configured as master or slave on one IDE ribbon cable, you may have a maximum of one of each.)
Also check the hardware compatibility list before you begin.
A tool to detect the hardware you are using is available as a DOS disk from the Ultimate Boot Disk site.
AMD x86_64: The wonderful thing about this hardware and a release of Linux compiled for this hardware is that it runs all your old i386 32 bit applications. In order to run third party browser plug-ins for which there is no source (Macromedia Flash, Real Player, ...) do NOT install the x86_64 version of the browser but instead, manually install the i386 32 bit version after the OS installation. I run Fedora Core 3 x86_64 on an AMD Athelon 64 but installed and run the i386 Fedora Core 3 RPM for the firefox browser. This allows all of the 32 bit plug-ins to integrate with the browser and operate successfully. One can also run programs compiled for i686 (/lib/i686/). How's that for compatibility!! The Fedora Core 3 Linux release has /usr/lib64/ as well as /usr/lib/. You will also find /usr/X11R6/lib64/ and /usr/X11R6/lib/ as well as compatibility libraries for i386 (i.e. /usr/lib/gcc-lib/i386-redhat-linux/...). The compilers gcc/g++ will compile a 64-bit executable. Given the option "-m32", the compiler will generate 32-bit executables. It's the ultimate developers platform as well!! I even have no problem running some old Red Hat Powertools 7.1 RPMs. Due to the native and highly integrated x86 32 bit processing with new 64 bit extensions, there is no 32 emulation or noticeable loss of speed when running 32 bit apps. The advantage of compiled 64 bit applications running on this chip is the 64 bit addressability (64 bits can address more memory and larger file systems) and handling of larger data chunks with a single operation.
This information should also be true for the Intel EM64T architecture.
| Documentation on the Installation CD: |
Online manuals can be read from the Linux CD-ROM by any operating system. From Windows you can look at your Linux CD and open the files with a web browser.
Fedora Core 1-6:
Release notes are on the first CD. For documentation see http://fedora.redhat.com/docs/.
RH 8.0, 9.0:
Documentation is contained on a CD separate from the 3 installation CD's.
RH 7.2:
Red Hat 7.2 has an identical layout to 7.1. Documentation is held on a dedicated CD with the same paths and files (If you substitute 7.2 for 7.1).
RH 7.1:
CDROM:\RH-DOCS\rhl-cg-en-7.1\index.html     - Red Hat Configuration Guide: RAID, Samba, Printers, Linuxconf, PGP
CDROM:\RH-DOCS\rhl-gsg-en-7.1\index.html    - Getting Started Guide: Gnome, KDE, Web, e-mail, Audio, Video, Gimp, ...
CDROM:\RH-DOCS\rhl-ig-x86-en-7.1\index.html - Red Hat Linux x86 Installation Guide
CDROM:\RH-DOCS\rhl-rg-en-7.1\index.html     - Red Hat Reference Guide: CCVS (Credit Card Verification System),
                                              Kerberos, LDAP, Powertools
CDROM:\FAQS\...                    - Frequently Asked Questions
CDROM:\HOWTOS\INDEX.html           - How To documentation from the "Linux Documentation Project"
The Red Hat 7.1 release put all documents on a separate CD labeled "Documentation CD".
RH 6.2:
CDROM:\doc\gsg\index.htm           - Red Hat Getting Started Guide
CDROM:\doc\install-guide\index.htm - RH Installation Guide
CDROM:\doc\ref-guide\index.htm     - RH Reference Guide
Note: RH 6.2 did NOT include the HOWTO section. See: http://en.tldp.org/HOWTO/
All releases contain documentation on DEC/Alpha installations in:
CDROM:\doc\alpha\
RH 6.1:
CDROM:\doc\rhinst\index.htm - Install Guide
CDROM:\doc\rhgsg\index.htm - Getting Started Guide
CDROM:\doc\rhref\index.htm - Reference Guide
RH 6.0: introduced the ``Getting Started Guide'' in:
CDROM:\doc\rhgsg\index.htm
RH 5.2/6.0:
CDROM:\doc\rhmanual\manual\index.htm - REDHAT manual.
CDROM:\doc\HOWTO\...     - RH 5.2/6.0/6.1
CDROM:\FAQ\HTML\Index.htm  - RH 5.2/6.0/6.1
| MS/Windows Backup and Recovery Plan: (if something fails in dual boot installation): |
For those who will be creating a dual boot computer and wish to maintain a windows partition or drive:
- Backup important partitions.
- Create a DOS boot floppy to restore a ``Master Boot Record'' if it gets corrupted.
- Create DOS/Windows recovery disks for DOS/Windows partitions. (For dual boot configurations)
It would be wise to make a backup of anything important that may reside on disks or partitions you don't intend on disturbing. The Linux installation has the option of installing one of the operating system loaders Lilo or GRUB. GRUB was introduced as the default Linux boot loader in Red Hat 7.2. The boot loader allows one to boot one or more operating systems and is usually installed on the master boot record of the hard drive (boot drive). In the case of Windows NT (or variants), the Microsoft boot loader is used to launch the Linux boot loader which will then boots Linux. As a precaution, it would be wise to have a rescue plan for the Master Boot Record.
DOS recovery disk: From DOS create a floppy:
C:\>FORMAT /U A:/S
C:\>COPY C:\DOS\FDISK.EXE A:\
C:\>COPY C:\DOS\FORMAT.COM A:\
C:\>COPY C:\DOS\MSD.EXE A:\
- DOS/Win9X:
A:\>FDISK /MBR C:
- Win 2000/NT: (boot from CD and enter "Recovery Console")
fixmbr
- Win XP: (boot from CD and enter "Recovery Console")
bootcfg /rebuild
Explanation of MBR: The Master Boot Record is on a sector of your hard drive which cannot be seen from your file system. It is separate. Upon booting, the system reads the MBR first. This points the computer to the portion of the disk where the operating system resides and the OS is loaded from there. When running a dual boot system, LILO (or Grub) in the MBR can point to more than one operating system from which to boot.
Windows 95 recovery diskette: To create a windows ``start-up'' disk, select ``Start'' + ``Settings'' + ``Control Panel'' + ``Add/Remove Programs'' then select the ``Startup Disk'' tab. This may require your Windows 95 CD-ROM.
Red Hat re-install on an existing system: Save configuration info
- Configuration files are held in the directory /etc/. Save a backup or hard copy of the "conf" files you need to re-configure your system. The command ls -lrt will list files in a reverse time ordered fashion. The newer files are listed last and are the ones most likely changed.
- Backup or print file /etc/sysconfig/rhn/systemid to preserve the configuration information for up2date. See pitfall
| Installation: |
I highly recommend that you choose "Custom Installation" mode and not Server or Workstation . Server and Workstation installation modes add pre-configured disk partitions which may wipe out stuff on drives you did not intend to disturb.A server-class installation does NOT install a GUI interface nor does it install X-windows. To install everything choose the "Custom" installation option. You can always turn off or ignore services and software you don't need.
[Potential Pitfall]: (RH 7.1) A server-class installation WILL erase all partitions both Linux and Non-Linux from every one of your computer's hard drives. This method will also put Lilo (or Grub) on the MBR. (Not good for Windows NT dual boot)
The "Automatic Partitioning" option (RH 7.1 and greater) is used by workstation, server and laptop class pre-configured installations and has the consequences of overwriting the MBR and re-partitioning all your drives. The "Manual" partition option is much more flexible.
Two manual partition tools are available:
- "Disk Druid" - I use this one
- fdisk
The auto option creates two partitions (/boot and /) and represents the most simple of installations. It is ideal for single user systems. A server or shared system may want to separate the users from the operating system by placing /home on a separate partition as well as /var and /opt. (More on this later)
Upgrades will be logged to the file /tmp/upgrade.log.
Linux installation is fairly intuitive except managing the disk partitions. The Linux CD-ROM is a boot disk, thus stick it in and re-boot your computer and the install menu will appear. If this does not work check your BIOS to see if your CD-ROM is in the list of boot devices. In my BIOS configuration I had to change the boot device default from A,C,SCSI to CDROM,C,A. After the installation was complete I changed it back. If you cannot boot from the CD-ROM, see instructions in section titled ``Creating a Linux boot floppy for Linux Installation'' in this guide. Most hardware is auto-detected during installation. The user is queried for the rest.
[Potential Pitfall]: (RH 7.2) RAID disk configuration requires text mode installation. Graphical GUI does NOT support RAID.
[Potential Pitfall]: (RH 6.1 and later) If the installation program presents itself as a text based console (DOS like) interface instead of a graphical based interface, chances are that the install program could not detect your graphics card and does not have the drivers for it.
Disk Druid: This is the disk partition manager. IDE drives are referred to as hda for the first drive, hdb for the second etc ... IDE uses separate ribbon cables for primary and secondary drives. The partitions on each drive are referred numerically. The first partition on the first drive is referred to as hda1, the second as hda2, the third as hda3 etc ... SCSI drives would be identified as sda, sdb ...
Linux IDE naming conventions:
Device Description Configuration /dev/hda 1st (Primary) IDE controller Master /dev/hdb 1st (Primary) IDE controller Slave /dev/hdc 2nd (Secondary) IDE controller Master /dev/hdd 2nd (Secondary) IDE controller Slave
Partitions: You will add at least three partitions. The first will be unnamed as a Linux swap partition of a given size i.e. 127Mb. (I'm generous and use at least twice the value of RAM memory on my system.) Add another as /boot of type ext2 Linux native and the third as /, Linux native ext3 (Red Hat native journaled file system) or LVM (logical volume manager: allows growing a file system by adding extra drives. Introduced in Red Hat Enterprise Linux 3 and Fedora Core) and [*] growable. The "growable" option takes whatever size is given as a minimum and actually allows the partition to take up the rest of the drive without actually specifying how much space is left. Use the space bar to toggle your choices between un-selected [ ] and selected [*]. (For RH 6.1 pick the select button.)
Mount Point Size Growable Type /boot 23Mb (RH9)
75Mb (RHEL4)[ ] Linux native (ext2)
(no need to journal /boot)_________ 512 (for 256 Mb RAM)
(Use RAM memory * 2)[ ] Linux swap / 100 [*] Linux native (ext3 or LVM)
RHEL 4 defaults: boot-75Mb
RH 5.2/6.0 defaults: boot-16Mb, swap-127Mb
Descriptions:
- Swap - used for virtual memory (Use the larger value: 2 x physical memory or 127Mb. Red Hat 7.1 directions recommends at least 254Mb.
- /boot - Bootable operating system kernel is placed here. No need for a journaled file system thus you can use ext2. (ext3 will also work)
- / - All the rest of the UNIX files are placed under this directory
- /home - User directories. Server configurations often make this a separate partition so that user's disk resources are limited. Another way to limit user disk resources is to use the quota feature. See YoLinux.com quota tutorial
- /opt - Optional software added to the system. (Software which didn't come with the OS. Some user /usr/local.)
- /var - Files with variable or changing state and size (log files, print spool files, etc.) Server configurations often make this a separate partition so that bloated log files, spooled print jobs, etc are limited to the amount of space they can consume.
- /tmp - Temporary space used by the system and user services.
- /sbin - System admin commands
- /bin - Binaries (commands/executables) which everyone uses.
- /etc - Configuration files.
- /usr - User binaries (commands), documentation, ...
- /... - The rest: /dev - devices, /lib - libraries, /mnt - device mount point, /lost+found - repository of corrupt but repaired files, ...
See Compaq ProLiant Server recommendations.
Server installations: It is common practice to create more partitions to isolate user, system and temporary file directories. In this way, a user would not be able to fill up a drive and lock-up the computer, nor would the installation of large software packages or the generation of temporary files or log files. Create separate partitions for /home (user space), /opt (optional, non-standard software packages) or /usr/local, /tmp, /var etc... Making /home and /opt a separate partition from / also helps Linux upgrades which can be set to write over and upgrade all partitions except /home and /opt. Separating partitions and placing them on separate disk drives can also increase performance by reducing the load on a single drive.
My Workstation: If the installation is for your very own workstation which no one else is using, you can get away with three partitions, "/boot", "/" and swap. It gives ultimate disk flexibility (all disk space is available for whatever you want) but no protection from your own stupidity is enforced.
Other partitioning tools: fdisk is another disk partitioning tool.DOS, Linux and other version of fdisk exist. I recommend Red Hat s Disk Druid .
Note: The placement of /boot is limited by the Disk Druid tool to account for BIOS limitations. Although unlikely, you may not have these BIOS limitations, in which case, use fdisk to partition the drive and no limitations will be imposed.
Note: The /opt directory is often used to create a separate directory structure for commercial and "optional" software which is not part of the base install. This way it is a separate self-contained environment which is easy to backup and restore separately from the rest of the system. The directory structure will often mimic the / directory with /opt/bin, /opt/etc, /opt/lib etc...
Specialized device drivers: If your hardware is on the bleeding edge and does not have support built in with the Red Hat installation CD, then you must provide the device driver during installation. Typically the Red Hat installation software will recognize that it does not have a driver for the hardware detected. For example: Red Hat 8.0 and the Adaptec U320 SCSI driver:
- Download the host bus adapter floppy image.
- Unzip the file: gzip -d aicXX..-i686-rh8.0.img.gz
- Copy floppy image to floppy: dd if=aicXX..-i686-rh8.0.img of=/dev/fd0 bs=1440k
The Red Hat installation program will request the missing driver. Load the floppy when asked: "No drivers found - would you like to select drivers now?". Select "yes". Press "F2" to provide the SCSI driver on a floppy and continue with the installation.
Other Installation Methods: This tutorial covers installation from a CR-ROM. It should be pointed out that Linux may also be installed from an NFS server, by FTP, SMB (a windows shared drive) and from a local hard drive.
[Potential Pitfall]: If using IDE, note that most BIOS's requires /boot be installed on a drive attached to the Primary controller. If using two IDE hard drives it might be best to place them on the primary controller and place the CD-ROM on the Secondary .
[Potential Pitfall]: When using SCSI devices, the /boot partition must reside on SCSI ID 0 or 1.
[Potential Pitfall RH7.0 and earlier]: NOTE: The /boot partition must be completely placed within the first 1024 cylinders of the disk. This drive geometry information is presented by Disk Druid under the heading Geom. The symbols [C / H / S] represent [Cylinders / Heads / Sectors] of the drive. (This is one reason why it may be easiest to install Linux on a separate drive and place the /boot partition at the beginning of the drive.) RH 7.1 introduced a newer version of LILO with LBA32 support which corrects this limitation. Red Hat 7.2 has even fewer restrictions. In fact RH 7.2 introduces new features which allow flexibility in choosing location and placement of file systems, boot loaders and kernel on your drive.
[Potential Pitfall]: I had one installation where I selected the "Check for bad blocks" while formatting and it caused the install to lock up. On this particular system I had to skip this check.
[Potential Pitfall]: If the hard drive was 100% entirely formatted for windows, there will be no space for Linux partitions. During the install you must select the windows partition and delete it before adding new partitions and assigning percentages.
Lets Do The Install: Partitions and mount points which are already allocated, are listed at the top of the screen. Use the "Tab" key to get to "Add" if you want to create a new partition for Linux. Use the "Tab" key to get to "Delete" , if you are going to put Linux on a partition previously used for DOS and then "Add" it as a new Linux partition.
Tab to the hard drive selection box which will have all drives selected.
       [*] hda
       [*] hdb
Tab to the drive you don't want to use and press the space bar to un-select.
       [ ] hda
       [*] hdb
Now add the partitions for /boot, /root (optional), "/" and swap (and any others you wish to add) as described above.
Lilo Text Boot Options:
- boot: text - No GUI. Console text mode only.
- boot: linux text console=ttyS0 - For use with a serial terminal
- boot: linux isa - To explicitly request ISA configuration dialog
- boot: linux mediacheck - Check ISO CD integrity
Red Hat 7.2 upgrade/install: EXT3 The 7.2 upgrade allows one to upgrade the Linux EXT2 file system to EXT3. EXT3 is a journaled file system which is crash resistant, insuring the integrity of the data even if the system crashes during a system write because it journals the transaction before it undertakes a disk write. I recommend the EXT3 upgrade. The RH 7.2 EXT3 upgrade will also disable periodic file system checks as it assumes that file system integrity is maintained. (See autofsck) Use tune2fs (-c or -i) to re-enable check. EXT3 is the default file system for a fresh Red Hat 7.2 installation. EXT3 may be installed in one of three modes:
- ordered: Default. Crash will result in a valid non-corrupted file system.
- journal: slow
- writeback: Fast but NOT crashproof.
The option is also specified in the file /etc/fstab with the string 'data=ordered'.
Also note that Red Hat 7.2 does NOT include a "Powertools" CD. Most of the "Powertools" packages have been included as part of the base installation.
| Lilo, Grub and boot loaders: |
Lilo is the Linux bootstrap loader used by the Red Hat distribution up to and including version 7.1. Red Hat version 7.2 defaults to the use of Grub as the default boot loader. Grub supports a password that controls access to a Grub shell.
Lilo and Grub are the Linux bootstrap loaders that actually loads and starts the kernel. Only one bootloader, Lilo or GRUB, is used. The Linux install will ask if you want to place lilo (or Grub) on the master boot record (MBR). The answer of course is YES (Unless you are installing Windows NT/2000. See special install section for dual booting with these operating systems). If you do not install Lilo (or Grub) on the MBR, you can boot Linux from a boot floppy which can be generated during the install.
Other bootstrap loaders are available. A DOS program called loadlin can boot Linux from DOS. Loadlin can be found on the Red Hat CD under CDROM:\dosutils\. Both loadlin.exe and the Linux kernel must be loaded on a DOS partition. A commercially available software product "System Commander" from V Communications requires and partially installs in a DOS partition. See: VCOM: System commander product information
SCSI and lilo: The choice of selecting "Use Linear Mode" during lilo install is a little complicated. PCs running Microsoft operating systems use a SCSI BIOS based LBA mode to access drives of more than 1,024 MB. This is the default selection for most PCs. Check your SCSI BIOS if you are un-sure.
RH 5.2: Use the Linux default lilo setting of [*] "Use Linear Mode" .
RH 6.0: The default was changed to [ ] where Linear mode is un-selected. This is incompatible with most Microsoft OS's. If you are dual booting with Windows, you will probably want to set to [*] "Use Linear Mode" .
RH 6.2/7.1: The default "Use Linear Mode" is pre-selected. This is compatible with LBA mode. (It implies LBA mode).
[Potential Pitfall]: If the system boots to a prompt "LI" and a blinking cursor and is stuck, you chose the wrong option for your SCSI configuration.
Systems using Unixware or older PCs with smaller drives may NOT be using LBA and thus Use Linear Mode must be unselected. If this selection is incorrect, your machine will not boot and the Master Boot Record will have to be restored and lilo will have to be re-installed.
Adaptec SCSI card users: Press ctrl-A on boot up to enter the SCSI card BIOS set-up. This is where you chose LBA mode or not. ( > 1 Gb addressing)
[Potential Pitfall]: Adding an extra drive on which to install Linux: If the drive is a pre-formatted drive for Microsoft Windows, and if you boot Windows after installing the drive you may experience the following problem. Windows will recognize and assign a letter to the new drive and may re-assign the letters assigned to your CD-ROM and previous drives. If installing a new pre-formatted drive, DO NOT boot to Windows. It would be best to boot from the Linux CD-ROM. The Linux install will allow you to assign the new drive as a Linux drive. Thus when booted to Windows (after the Linux install), the system will not recognize the new Linux drive and therefore will not reassign your drive letters.
Pitfall Fix: If you do reboot to Windows and Windows re-assigns your drive letters for your CD-ROM, restore the settings by:
- "Start" + "Settings" + "Control Panel"
- Select "System"
- Select the tab "Device Manager" and select the CD-ROM
- Set the drive letter to the letter of your choice.
Kernel Boot Options: (see /etc/grub.conf or /etc/lilo.conf)
- nosysinfo :Disable NPL thread support. Used for RH 9.0 to fix incompatibility of Java version earlier than 1.4.1.
- root=LABEL=/ :Location of root of filesystem.
GRUB: GRUB allows one to boot one of many operating systems installed on the hard drives. GRUB can hide partitions from operating systems which is important when cohabitating with a Microsoft operating system. You can use a partition to install an operating system and hide the other partitions from it. (GNU: GRUB home page)
Grub was introduced with Red Hat 7.2 as the default boot loader. It's configuration file is /boot/grub/grub.conf. While lilo requires reconfiguration with new information loaded on the MBR for each new kernel, grub does not. Grub requires that the new kernel information be entered in the configuration file /boot/grub/grub.conf.
A Red Hat7.2 installation using lilo may be switched to grub using the command /sbin/grub-install. (i.e. /sbin/grub-install /dev/hda Specify the drive on which the boot loader will be installed on it's MBR.)
GRUB Menu:
- Select kernel
- Press 'e' to edit entry
- Use arrow keys to navigate to kernel line. i.e. kernel /vmlinuz-2.4.7-1 ro root=/dev/hda2
- Add argument 'single' to the end of the line. Then press return.
- Press 'b' to boot.
The Red Hat 7.3 Installation/Upgrade offers three choices:
- Update current: Update boot loader currently on the system.
- Skip update
- New boot loader configuration: Choose this if you wish to update from Lilo to Grub.
| Completing Install: |
[Potential Pitfall RH7.2 Upgrade]: After Grub/Lilo options have been entered the installation software examines your system for packages to upgrade. Be Patient. It may appear that the system locked up but it is just working on the upgrade. It takes a while.
Linux System Kernel Note: The default Linux kernel installed supports a multitude of devices using loadable modules. In order to keep the kernel small, maximize device support and minimize memory usage, the appropriate module is loaded at run time. The kernel may be optimized for performance by compiling in support for the specific devices needed. Video drivers are not controlled by the kernel but by the X-window application program.
Kernel boot options are set in the config file /etc/grub.conf
i.e.: kernel /boot/vmlinuz-2.6.10-1.770_FC3 ro root=LABEL=/ rhgb quiet
- Remove "quiet" if you would like to see the kernel boot information.
- Add "vga=788" to set a larger text console at boot.
- Disable SeLinux mode, add: "selinux=0" or (preferred) set in /etc/selinux/config:
- Security policy is enforced: SELINUX=enforcing
- Security policy is disabled: SELINUX=disabled
- Print warnings instead of enforcing: SELINUX=permissive
- Graphical Boot Loader: "rhgb"
- Remove "hiddenmenu" to see Grub boot menu.
Note: Install output is written to five of the virtual consoles. Note these key bindings are for the installation only.
Console # Key Output 1 Alt-F1 Installation Dialog 2 Alt-F2 Shell Prompt 3 Alt-F3 Install Log 4 Alt-F4 System Log
(from OS kernel)5 Alt-F5 Other Messages 7 Alt-F7 X Graphical Display (new to RH 9.0)
Screen shots of the installer can be made using "Shift" + "Print Screen". Screen shots will be saved to /root/anaconda-screenshots.
Mouse: If your connector at the end of your mouse is round, you have a PS/2 bus mouse. Many UNIX programs require three mouse keys. If yours has only two, choose the three button emulation. In emulation mode, pressing both mouse buttons at the same time is the same as pressing the middle button on a three button mouse. The typical X-Window interface uses button 1 to select (i.e. text), button 2 to paste and button 3 to pull up optional menus.
Printers: Note that DOS calls your printer port "lpt1". Linux refers to your first printer as /dev/lp0. The numbering of all Linux devices starts with 0. (0, 1, 2, 3...) The printer will also be assigned a given name. A printer of the name "lp" will be considered the default printer. Another printer definition may be duplicated under this name to make it the default. (Create a default printer of this name "lp" and life gets easier because many applications such as Adobe Acrobat reader rely on this default.)
Upgrade Note: Some really old versions of Linux began printer numbering at lpt1. If upgraded, this would have to be changed to reflect a newer version of Linux.
Unix Time: Most web servers use UTC (Universal Coordinated Time) and an environment variable representing one's time zone as an offset and whether Daylight Savings Time is observed. This is used to calculate the displayed time. UTC is the method used by standard UNIX to measure time internally. It is the total number of seconds from January 1, 1970.
Authentication: The basic standard authentication configuration uses the installation defaults:
- "Enable MD5 passwords"
- "Enable Shadow passwords"
The other options are NIS, LDAP and Kerberos. All three rely on the configuration of an authentication server for this purpose. The MD5/Shadow configuration is a stand alone password authentication system residing on the Linux systems and is only effective for that system.
- NIS is the SUN "yellow pages" authentication server configuration which is most commonly used with the NFS file sharing infrastructure.
- LDAP uses an authentication server which holds a database of logins and passwords.
- Kerberos is MIT's high security network based authentication scheme.
Sample Network Configuration:
- IP address: 192.168.100.101
- netmask: 255.255.255.0
- Network address (lowest): 192.168.100.0
- Broadcast address (highest): 192.168.100.255
The networking addresses beginning with "192.168." are reserved for private local networks.
| Creating a boot floppy for Linux Installation: |
This is only necessary if you can not boot from the CD-ROM.
Creating Linux install diskette from a Microsoft OS: Use rawrite to load the file boot.img to the diskette from the CD-ROM (D:\ in this example):
       C:\> D:
       D:\> CD \DOSUTILS
       D:\DOSUTILS> RAWRITE D:\IMAGES\BOOT.IMG A:
RAWRITE does not work with NT/2000. Use winimage.
Creating Linux install diskette on Unix/Linux:
       mount -t iso9660 -o ro /dev/cdrom /mnt/cdrom
       cd /cdrom/images
       dd if=boot.img of=/dev/fd0 bs=1440k
The -o ro option mounts the CR-ROM as Read Only.
| Post Installation Configuration: |
Post Install: (perform these functions as root user)
Login:
- Upon boot (if text mode) the loader (LILO) will show the prompt "boot:". Press Return to take the default or type ? or tab to see all possible selections then type the selection. i.e. type linux to boot Linux or dos (default name given for the Microsoft partition), or win95" if that is the name you gave for MS/Windows 95 upon Linux partitioning and install. The defaults and configuration of lilo may be altered. See the section on lilo and /etc/lilo.conf.
- At the Login: prompt, enter the user id root and give the password you chose during install. This will log you into the system in command console mode. (If set to text mode init level 3)
X-Windows:
- startx : This command start the graphical user interface X- windows system.
- If X windows fails:
- RH8.0: Use the X windows configuration tool /usr/bin/redhat-config-xfree86. This will edit the configuration file /etc/X11/XF86Config
- RH7.3-: If this fails one can reconfigure X windows with the command Xconfigurator. (or you can also use XF86setup or xf86config which performs a similar function) This produces the same graphics setup interface as the installation. Xconfigurator generates the file /usr/X11R6/lib/X11/XF86Config (This is linked to /etc/X11) (See /usr/X11R6/lib/X11/doc/README.Config)
- The /etc/X11/XF86Config file holds X-windows configuration information about the graphics card, monitor, mouse and keyboard.
- For my 17 inch monitor (1280x1024 resolution) I configured X-Windows for a resolution of 1024x768 for better readability.
- If you find that the text and other details on the screen are too small, use Xconfigurator to set up a configuration file using a lower resolution. You can save multiple configuration files and rename them to /etc/X11/XF86Config when needed.
- To exit out of X-windows and the GNOME interface gracefully, select the GNOME Start icon (left side of tool bar) and select log out . Changes to the XF86Config configuration file will not be implemented by X-windows until it is halted and restarted. This can be done by rebooting the system (shutdown -h now) or logout and go to a console terminal (ctrl-alt-F5) and login as root. The command "init 3" (Red Hat systems) will bring the system out of X-Window mode. The command "init 5" will bring it back. See the YoLinux.com tutorial on the Linux init process for more info.
- The key sequence <ctrl>-<alt>-<F2> will allow you jump out of a mis-configured X-windows session and go to a console. If the X-window session is inoperable you can kill the process from this new console. The command ps -a will reveal the startx process id (PID). Then kill <process id number>. Your initial console upon boot is ctrl-Alt-F1. Use ctrl-Alt-F7 to return to the X-window session. The simplest and recommended method to kill the X-Window session is to use the key sequence ctrl-Alt-Backspace.
Leaving the system: (UNIX text console commands)
- exit : This is the command to logoff. This allows one to re-login as new user
- /sbin/shutdown -h now : shutdown the system. (Must beroot) Wait for the message:
- RH 5.2: System halted .
- RH 6.0+, FC: Power Down .
- Do NOT turn the power off without doing this first.
Red Hat 9.0: Support dropped for wu-ftpd (use vsftpd instead), Window Maker and sndconfig.
Red Hat 8.0: Nautilus application and system configuration tool is invoked with the "Start here" icon. RH 8.0 introduces a new default printer manager: cups. See config files /etc/cups/.... Man pages exist for most of these config files. (i.e. man printers.conf) The older lpd can still be optionally installed.
Red Hat 7.2 upgrade: After X login, a dialog box asks the user if they wish to upgrade their file manager to Nautilus. (your choice) Nautilus is a very MS/XP like interface which provides a combined file and system manager GUI tool with a web like interface. Nautilus is invoked with the "Start here" icon.
| Installing NVidia Graphics card drivers: |
The commercially supported proprietary graphics drivers for NVidia graphics cards are not included with the Red Hat distribution. Only a basic driver is available. (Good enough for the 2-D world) The NVidia drivers are libraries and loadable modules which are tightly integrated with the kernel for ultimate OpenGL, 3D and DRI integration and performance. To install the NVidia graphics drivers, boot the kernel which you wish to use with the NVidia drivers. The NVidia driver installer will use the running kernel as it's target. The NVidia installer is a console (non X-Window graphics) shell script program which will detect which kernel you are running and download the appropriate drivers. If you are running a known kernel (i.e. a prebuilt Red Hat kernel) it will install a prebuilt driver. If you are running a custom kernel you MUST have the appropriate kernel source available as it will attempt to rebuild the kernel from source with the appropriate NVidia kernel modifications and support. Installation:
- Download the NVidia installer script from:
- Enter console mode without running W-Windows: ctrl + alt + F1
- As root bring the system to init level 3 by:
- Boot with /etc/inittab entry:
id:3:initdefault:
OR - Issue the command: init 3
- Boot with /etc/inittab entry:
- Run the NVidia installer in console mode: sh NVIDIA-Linux-x86-1.0-4496-pkg2.run
- Bring system to init level 5:
- Reboot with /etc/inittab entry:
id:5:initdefault:
OR - Issue the command: init 5
- Reboot with /etc/inittab entry:
- Edit file /etc/X11/XF86Config to tweak options. (Sample for NVidia Quadro Pro Dual Monitor)
Using YUM to install nVidia drivers for kernel currently running:
- yum install nvidia-glx kernel-module-nvidia-`(uname -r)`
- yum install kernel-module-nvidia-`(rpm -q --queryformat="%{version}-%{release}\n" kernel | tail -n 1)`
[Potential Pitfall]: File /etc/X11/xorg.conf
If not updated, change in the "Device" section, from:
Driver "nv"
to:
Driver "nvidia"
[Potential Pitfall]: If switching init levels does not work, then changes may be required to udev in which case you need to reboot the system so that the device path is generated: /etc/udev/devices/nvidia*
Module loading may be forced by adding the following entry to the end of /etc/rc.local, /sbin/modprobe nvidia
[Potential Pitfall]: NVidia Quadro Pro dual monitor cards may produce stretched images in Open Office or Adobe Acrobat reader.
See: YoLinux.com: Dual Monitor Configuration - Fix for dual monitor configuration and pitfalls
Links:
- FedoraFaq.org: How to do a custom installation of the nVidia drivers
- FedoraFaq.org: Enabling Fedora core 3 nVidia 3D support
| System Services: |
After installation of Linux one should determine which system services one needs. Each available service has a start script in the directory /etc/rc.d.init.d/. See the YoLinux.com init process tutorials.
It is easiest to use the Red Hat GUI tool:
- Fedora Core 3: /usr/bin/system-config-services
- Red Hat 8/9, FC 1: /usr/bin/redhat-config-services
Recommended basic services include: anacron, atd, autofs, cron, gpm, iptables, keytable, kudzu, microcode_ctl, network, random, rawdevices, syslog and xfs.
| Features and Changes: |
Red Hat Enterprise / CentOS:
- Red Hat Enterprise 5:
- Includes OpenMPI
- Subversion uses Berkeley DB rather than FSFS default
- Includes the Red Hat Directory server rather than OpenLDAP
- Global Filesystem GFS2
- Compiz 3D desktop
- Dogtail disability access support
- Apache 2.2 and PHP 5.1
- NFS mount/umount now is /sbin/mount.nfs/umount.nfs
- CUPS web interface http://localhost:631
- up2date deprecated in favor of yum
Fedora / Red Hat Legacy:
- Fedora Core 6:
- Unified kernel supports both SMP and uniprocessor hardware. Separate kernels no longer required.
- Interface: Improved desktop look and feel, window manager (Compiz) , improved X-windows, fonts (default font: DejaVu), artwork/graphics.
- Improved printer support (CUPS 1.2), improved YUM, Evolution, Nautilus
- New applications: GnuCash, virt-manager (for Xen), SELinux graphical troubleshooting tool, integrated smartcard (Coolkey), cluster volume manager (lvm2-cluster).
- Totem now default media player (not Helix)
- Improved performance: ext3 file system, dynamic linking (DT_GNU_HASH), Fontconfig, NFS (CacheFS), CUPS.
- Fedora Core 5:
- FC5 includes Mono and Mono applications.
- FC5 includes mySQL5, the Geronimo J2EE server.
- FORTRAN 90/95 upgraded from FORTRAN 77
- Changes to the SELinux reference policy.
- Wireless support for Broadcom 43xx wireless chipsets.
- Changes FC4 to FC5
- Fedora Core 4:
- Introduces gcc version 4, Eclipse IDE with CDT and valgrind.
- Introduces Evince (and poppler libraries) to replace gv and xpdf.
- No Mozilla, gv (ghostscript front-end), fvwm2 desktop, cdp (CD player, introduces apolos)
- Changes FC3 to FC4
- Fedora Core 3: Stable (similar to RHEL4)
- Ships with SELinux (Security Enhanced Linux) which works.
- Introduces Firefox browser. Previously Mozilla only.
- Fedora Core 2:
- System configuration GUI tools name changes from redhat-config-xxxx to system-config-xxxx.
- SELinux introduced. Needs work.
- Ships with Linux kernel 2.6 and ALSA (sound)
- No longer ships with XFree86. Now shipping with Xorg release of X-Windows.
- Fedora Core 1:
- Name changes to Fedora Core and confuses the Linux world.
- Red Hat 9.0: Stable (similar to RHEL3)
- Introduces vsftpd. Was wu-ftpd.
- Introduces Apache 2.0, Subversion CM.
- LDAP default configuration changes. May require database dump and reload.
- NPL: Native POSIX Thread Library
- Networking now uses /etc/sysconfig/network-scripts/route-interfacename rather than /etc/sysconfig/static-routes.
- CUPS print spooler is default.
- Red Hat 8.0: Stable
- They stop shipping LDAP admin tool gq.
- Ships with OpenOffice
- Apache RPM is now called httpd.
- Netscape browser no longer ships with OS.
- Introduces UML (User mode Linux)
- No longer ships with xmms MP3 plug-ins. Find and load.
- Red Hat 7.3: Stable
- Introduces CUPS print spooler.
- Red Hat 7.2:
- Kernel 2.4
- Red Hat 7.1:
- Linux Firewall: Introduces iptables. Earlier version used ipchains.
- Introduces DNS bind 9. Previous versions used bind 8.
- Introduces LDAP 2.0.
- Red Hat 7.0:
- Introduces xinetd. Previously used inetd.
- Default web server directory changes from /home/httpd/html/ to /var/www/html/.
- Red Hat 6:
- Introduces Gnome desktop.
- Linux Firewall: Introduces ipchains. Earlier version used ipfwadm.
- Red Hat 6.2 introduces Judzu for device discovery and initialization.
| Pitfalls and Fixes: |
- General Pitfalls:
- [Pitfall]: Installation locks up and you have no keyboard or mouse control. I have found this problem when using a USB mouse on RHEL4 and FC4. Install the OS with a PS2 mouse and plug-in the USB mouse after installation and boot. The USB can even be a hot plug-in while the system is running.
- [Pitfall]: Man pages don't display properly. Escape characters are not interpreted properly. A quick fix is to set the lang environment variable: export LANG=C
- A service will not start upon system boot. i.e. After an upgrade from RH7.2 to 9.0 my web server would not start even after using the command chkconfig --add httpd. I had to force the entry with chkconfig --level 345 httpd on. This can happen to any service and this is how to fix it.
- Platform x86_64 Pitfalls:
- Don't install 64 bit versions of Mozilla or Firefox. See Mozilla/Firefox x86_64 Platform Pitfalls and Fixes
- Video Problems:
- If the Installation program does not recognize your graphics card, the installer defaults to a text console mode rather than use the GUI mode. It will also not install a proper video driver and your system will not boot to the graphics mode and you will not have a graphical desktop. You can edit the X-windows configuration file and specify a basic VGA graphics driver which can give you simple 2-D graphics. The VGA mode is supported by all the graphics cards I have encountered.
Edit file: /etc/X11/xorg.conf..
...
Section "Device"
Identifier "Videocard0"
Driver "vesa"
VendorName "Videocard vendor"
BoardName "Generic"
EndSection
...
..
Specify the generic VGA video driver.
- If the Installation program does not recognize your graphics card, the installer defaults to a text console mode rather than use the GUI mode. It will also not install a proper video driver and your system will not boot to the graphics mode and you will not have a graphical desktop. You can edit the X-windows configuration file and specify a basic VGA graphics driver which can give you simple 2-D graphics. The VGA mode is supported by all the graphics cards I have encountered.
- Sound/Audio Problems:
- Default settings may have sound muted. Run /usr/bin/alsamixer, /usr/bin/kmix (KDE sound/volume mixer), or /usr/bin/gnome-volume-control (GNOME desktop sound/volume mixer) and make sure that the Master and PCM volume settings are not muted.
- RH 8.0: Test audio with /usr/bin/redhat-config-soundcard. Just a testing tool. Does not alter /etc/modules.conf
Also: /sbin/sndconfig. (sndconfig support dropped in RH 9.0) alters /etc/modules.conf. - To set all controls to maximum volume: aumix -v100 -w100 -b100 -s100
- Check permissions on devices: /dev/dsp, /dev/sndstat, /dev/mixer
- Check the file /etc/modules.conf to see if your system is loading the proper module to support your sound card. If edited, re-boot so your kernel will pick up the changes.
- Test under user id root. If it works when logged in as root but not as a regular system user, it is a security configuration problem. The user does not have the privaleges to access the hardware devices necessary. See the YoLinux.com Tutorial on Managing Group Access.
- If you can not get your sound card to work try entering your BIOS configuration and removing "plug-and-play" support.
- [Pitfall] My sound card would not record using the microphone after installation. The final resolution was that it was a conflict with the motherboard built-in sound card support. The BIOS allowed me to select an IRQ for the on-board sound device. By selecting a new IRQ, the PCI sound card began working flawlessly. The BIOS option of disabling the motherboard device did nothing.
- Fedora Core:
- FC-4 uses GCC 4. Compatability library RPMs allow running older software. Install RPM packages: compat-gcc-32, compat-libstdc++-33, compat-libstdc++-296
- System won't shut down? Using Hyperthreading? Add "acpi=ht to the line "kernel /boot/... in file /etc/grub.conf
- Nautilus default behavior was changed to open new windows for each sub directory you enter. VERY ANNOYING!! Make it operate normally by selecting "Edit" + "Preferences" + select "Behavior tab" and choose option "Always open in browser windows"
- I downloaded and burned ISO CD's. During install one is offered the choice to verify the CD. It failed verification but installed ok. I'm not sure what to make of it.
Update: linux mediacheck nocddma - FC 3: The x86_64 version of gftp crashes and is not functional. Download and install the 32 bit version:
- rpm -e gftp-2.0.17-3
- rpm -ivh gftp-2.0.17-3.i386.rpm
- One of the first things you will notice is that the boot screen is now hidden from view by a graphical boot screen. You can revert back to the text console boot screen by editing /etc/sysconfig/init
Change "GRAPHICAL=yes" to "GRAPHICAL=no".
- Upgrade/Install: RH 9.0:
- [Pitfall] Post install/RPM upgrade. Do not use rpm -Uvh glibc*, use the command rpm -Fvh glibc*. This "Freshen" option will upgrade previous files if they exist. Also see: https://bugzilla.redhat.com/bugzilla/show_bug.cgi?id=88456
- [Pitfall] Java version older than 1.4.1 will be incompatible with the kernel NPTL threads library of the Red Hat 9.0 kernel. One can disable NPTL by the following:
- Kernel option: nosysinfo
(use in /etc/grub.conf) - Set environment variable:
- export LD_ASSUME_KERNEL=2.42
- export LD_ASSUME_KERNEL=2.25
- Kernel option: nosysinfo
- [Pitfall] Ximian Gnome RPMs are not compatible with RH 9.0 Gnome due to version conflicts. Remove before upgrading or install new version after upgrade.
- [Pitfall] If upgrading from RH 6.2, all upgrades must be installed first or upgrade will fail.
- [Pitfall] Installing X-CdRoast may conflict with the archive CD burning facility within Nautilus. (using folder burn)
- Mozilla browser plug-in problems? Upgrade from 1.2.1 to 1.31
- Xmms MP3 plug-ins: Red Hat 8/9 RPMs - Download xmms-mpg123-1.2.7-21. Red Hat 9.0 install will include xmms-1.2.7-21, xmms-skins and xmms-devel.
- See fix for Mozilla plug-in "plugger".
- Upgrade/Install: RH 8.0:
- [Huge Problem Pitfall]: Systems using Adaptec SCSI chipsets (U320) with aic79xx drivers beware!!! You may get file corruption problems while handling large files (>.4Gb). Red Hat 8.0 ships with the Adaptec driver 1.0.0. At this time the latest driver from the Adaptec open source support web site is version 1.1.0. Use at least version 1.3.0 available from the Adaptec Linux driver home page http://people.freebsd.org/~gibbs/linux/. Red Hat 9.0 is also a problem. Installation drivers and Red Hat RPM's are also available from this site. Also see http://bugzilla.redhat.com bug #97786
- [Potential Pitfall]: Java based GUI installer for Borland Togethersoft would not work on KDE desktop (messed up/locked up display) but it would for Gnome. FYI.
- The configuration tools for RH 8.0 are all new. See System Re-Configuration section below.
- [Potential Pitfall]: Desktop application launch icons located in $HOME/.gnome-desktop/ no longer allow a command to be prefixed with "cd $HOME;". Only a single command may be referenced. It is no longer required. (It use to be required so that applications were not launched from the sub directory.)
- Many applications one expects with Red Hat Linux were missing but are still available from previous 7.x releases or from the application web sites:
- xmmx MP3 player mpg123 rpm's - Red Hat had MPEG licensing issues
- xanim-2.80.1-12.i386.rpm - Video player - last shipped with RH 7.1 Powertools
- xine-0.9.8-4.i386.rpm - xine-devel-0.9.8-4.i386.rpm - MPEG video player (RH 7.3) [xine downloads] - Video player
Alsa-lib - aalib - libfame - flac - xvidcore - xine-libs - xine - - xpaint-2.6.1-1.i386.rpm - RH 7.1 graphics paint program
- gq-0.4.0-5.i386.rpm - LDAP admin tool - last shipped with RH 7.3
- kwintv-0.8.5-5.i386.rpm - TV viewer for Hauppauge TV card - Last shipped with RH 7.1 Powertools
- Many Red Hat clone distributions were required to remove trademarked Red Hat logos and replace them with their own. (i.e. Cheap Bytes calls their Red Hat distribution "Pink Tie".) To restore the installation to a Red Hat clone download and install the following RPMs: (Use command: rpm -ivh --force name-of-rpm.rpm)
- redhat-logos-1.1.6-2.noarch.rpm
- redhat-artwork-0.47-3.i386.rpm
- redhat-release-8.0-8.noarch.rpm
- initscripts-6.95-1.i386.rpm
(Provide your own graphics and text to customize your system.) - [Potential Pitfall]: Case study - Dell Precision 340 with IDE hard drives, CD and DVD, Adaptec SCSI 29160. The SCSI module would not load even though it is listed in the /etc/modules.conf. The SCSI driver module (aic????) was not listed as loaded when the /sbin/lsmod command was issued. I had to add an entry to the file: /etc/rc.d/rc.local:
insmod aic7xxx - [Potential Pitfall]: My upgrade corrupted the RPM database. Once that is gone, the installation, maintenance and upgrades of rpm packages is impossible. At this point I re-installed. I believe that my disk approached 100% capacity. Make sure you have enough space. I had close to 1Gb free but it may not have been enough. (???)
- [Potential Pitfall]: My up2date ,configuration no longer worked after the new installation. To recover my old configuration I edited the file /etc/sysconfig/rhn/systemid and changed the string values for checksum, system_id, profile_name and username to values from my backup.
- [Potential Pitfall]: The default installation uses Unicode instead of ASCII representation. (UTF-8 is the ASCII compatible Unicode encoding.) Some applications do not utilize Unicode and thus must be directed to use English ASCII.
Turn off localization: env LANG=C abiword
OR
define localization: (ISO 3166, 639) env LANG=en_US abiword
The GUI tool redhat-config-language can change your system language settings. For more info see "man locale". - [Potential Pitfall]: The default Red Hat 8.0 behavior for regular expression computation is NOT backwards compliant with UNIX. Tools which use regular expression syntax such as grep, awk, sed,... Red Hat 8.0 will NOT perform as expected for the default locale en_US.UTF-8 LANG assignment. It will behave in a case insensitive fashion. (Usually one uses grep -i to force case insensitivity.) Example:
File: testRegEx.txt You can also set the environment variable LC_ALL=C which overrides the LANG environment variable..XYZ
abc
abcXYZ
[prompt]$ grep [A-Z] testRegEx.txt
XYZ
abc
abcXYZ
[prompt]$ export LANG=C
[prompt]$ grep [A-Z] testRegEx.txt
XYZ
abcXYZ
- [Potential Pitfall]: Apache 2.0 is now included and in not compatible with old modules. If using Tomcat servlets or any module which is Apache 1.3 dependent, do NOT upgrade Apache (RPM httpd).
- [Pitfall]: The "vi" editor goes into a funky highlight mode when editing specialty files such as html. This is due to a symbolic link of vi to /usr/bin/vim. To get non-highlighted old fashioned "vi" operation use the command: unalias vi. The vi command will now reference /bin/vi
OR
See setting default vim color scheme. - [Pitfall]: Rumor (??) Don't run the Gnome Galeon browser and Mozilla at the same system.
- Upgrade: RH 7.3:
- [Potential Pitfall] Upgrade from Red Hat 7.1 to 7.3 broke the "Photo Album" web cgi I was using due to bugs in Image Magick. To fix this I had to reinstall the old version by performing the following steps:
- rpm -e ImageMagick ImageMagick-perl ImageMagick-devel xfig
- ln -s /usr/lib/libbz2.so.1.0.2 /usr/lib/libbz2.so.1.0
- rpm -ivh --nodeps ImageMagick-5.3.7-1.i386.rpm ImageMagick-devel-5.3.7-1.i386.rpm ImageMagick-perl-5.3.7-1.i386.rpm
- [Pitfall] Application xCdRoast fix:
My launcher now states: cd $HOME/;xhost +localhost;/usr/bin/xcdroast
The wrapper controlling xCdRoast is like "sudo" in that it executes the application with root privileges. This of course may conflict with the application owner of the X-windowing system process (unless you are operating as root to begin with). You must first grant access to root to access the display with the xhost command. Starting xCdRoast from the menu worked. The only problem was launching by command. - [Pitfall] Some KDE applications did not work due to overprotective (for a private workstation) directory permissions. To fix this:
      [ root prompt]# cd /usr/lib
[ root prompt]# chmod -R ugo+x kde2-compat - [Pitfall] On one desktop machine, all the desktop icons where duplicated. This is because Nautilus and Gnome were both displaying the desktop icons. To fix this, turn off the rendering of desktop icons by Nautilus. Select the "Start Here" icon on the desktop tool bar or choose the menu "Programs" + "Applications" + "Nautilus" to start the Nautilus manager. From the Nautilus manager window toolbar, select "Preferences" + "Edit Preferences...". Select "Window and Desktop" from the left panel and un-select the option "Use Nautilus to draw the desktop".
- [Pitfall] Some of my desktop icons (launchers "lost" their graphic and one even got renamed. (What is going on??) Each upgrade seems to lose a few graphics and gain a few new ones. The files to repair are found in $HOME/.gnome-desktop/ (i.e. /home/user1/.gnome-desktop/) You can also right click the icon select "properties" and use the gui tool. Icons are located in /usr/share/pixmaps/. Due to all the changes I have begun using my own repository /opt/share/pixmaps/.
- [Pitfall] I'm often the type who installs everything and turns on what is needed. I am starting to re-think this strategy. My upgrade of a system from 7.1 to 7.3 took 3.5 hours!!!!! This is of course dependent on the speed of your system. This was a 350MHz, 256Mb, IDE system. The more you have loaded or the more packages you choose to install, the longer it takes to upgrade. The upgrade prompt "Preparing to install..." held for 20 minutes. At first I thought the system froze. BEWARE!!!
- [Pitfall] In the beginning of the upgrade, the system prompts "Boot from ATAPI CD-ROM:". Press "Enter" right away with no delay!! Otherwise it continues to boot from the hard drive with your existing installation rather than performing the upgrade. This message of course only applies to systems with an ATAPI CD-ROM.
- [Pitfall] After the boot loader configuration screen appears, the upgrade pauses to search for packages to upgrade. Have patience. The message "Finding packages to upgrade..." will appear. It took over 10 minutes!!! Another penalty of having too much loaded.
- [Potential Pitfall] Upgrade from Red Hat 7.1 to 7.3 broke the "Photo Album" web cgi I was using due to bugs in Image Magick. To fix this I had to reinstall the old version by performing the following steps:
- Install: RH 7.2:
- CD-Rom mounting problems: SCSI subsystem used with IDE drives to support CD-Rom burning. If module does not install properly the drive will not mount. To see if module was loaded use the command lsmod and look for module sr_mod. If it is not listed then it did not load. One may manually load the module by issuing the commands depmod and then modprobe sr_mod. The CD-Rom should then be mountable.
- Desktop/Gnome problems:
- Desktop Launcher icon labels: Many began to display "application-label.desktop" instead of just the application label. Change the contents of the configuration file $HOME/.gnome-desktop/application-label.desktop
From:[Desktop Entry]
Name[en_US.ISO8859-1]=application-label
Exec=cd $HOME;/usr/bin/application
Icon=/usr/share/pixmaps/application.png
Terminal=false
MultipleArgs=false
Type=Application
[Desktop Entry]
Name=application-label                              - Add this line
Name[en_US.ISO8859-1]=application-label
Exec=cd $HOME;/usr/bin/application
Icon=/usr/share/pixmaps/application.png
Terminal=false
MultipleArgs=false
Type=Application
- Desktop Launcher icon labels: Many began to display "application-label.desktop" instead of just the application label. Change the contents of the configuration file $HOME/.gnome-desktop/application-label.desktop
- To generate a desktop launcher I created a toolbar launcher and then moved it to the desktop with a drag and drop. (The menus have changed)
- Interface change: Note that the graphical symbol "X" to kill the window moved from the top right to the top left corner of the window.
- [Pitfall]: My start script for xinetd on one of my servers would give the following error:
- [: =: unary operator expected
- [ ${NETWORKING} = "yes" ] || exit 0
- [Pitfall]: After upgrade from 7.1 to 7.2, Gimp hung when I attempted to launch it. To fix this problem I removed the xsane plug-in: rm /usr/lib/gimp/1.2/plug-ins/xsane
- [Pitfall]: After upgrade from 7.1 to 7.2, the toolbar application, "panel", would crash upon desktop start-up. (Not sure why but my guess is that the old settings were incompatible) To fix this, I created a new user and logged in as this user. The toolbar was displayed correctly. Starting up under my own id then launched the toolbar correctly. I then changed a bunch of the tool bar properties. This temporarily cleaned up the problem by writing a new and correct configuration.
Permanent panel fix: Update gnome with Gnome 1.4.0.6-1 RPM's. This was required even after using up2date (on Feb 1, 2002) to get all the latest Red Hat fixes. Check your version of gnome with the command: rpm -q gnome-core You may also have to copy a new version of the panel config file to your directory: cp -p /etc/gnome/panel-config/panel $HOME/.gnome/panel - [Pitfall]: When I upgraded to Red Hat 7.2 from 7.1, both of my TV viewing programs, KwinTV and Zapping, behaved flaky with poor tuning. The only solution I could find was to remove them both (rpm -e kwintv zapping) and then re-install them.
- [Pitfall]: The "vi" editor goes into a funky highlight mode when editing html files. To get non-highlighted old fashioned "vi" operation use the command: ex -v file-name
Add to the file $HOME/.bashrc: alias vi='ex -v' - [Pitfall]: Installing on Red Hat Linux on one of those $250.00 BTC-USA/VIA Linux computers from Fryes? They have a Linux VIA modem driver which I could not compile because of incompatible structure definitions in the include (.h) header files. Give up and buy a Linux compatible modem. Could not get the microphone to work either. BTC Support: (510)657-3856 x356
- Install: RH 7.1:
- [Pitfall] Linux now supports more APM features, but that is both good and bad. APM (Advanced Power Management) is good for laptops but often bad for desktops as the hardware may support it poorly. APM controls screen blanking and power saving features required by laptops. On the desktop it has been a source of many random lock-ups I experienced just after or near the end of the boot sequence. I STRONGLY recommend that you boot and enter your bios and turn off all APM features. You may just find that boot reliability goes from flaky to flawless.
Apm standby: apm -S
Apm suspend: apm -s - [Pitfall] Note on iptables and ipchains support.
- [Pitfall] In a fresh install of RH 7.1 I found that the DNS service "Bind" (named) could not be added to the init process using the chkconfig --add named command. Use the command chkconfig --level 345 named on to force bind to start upon system boot.
- [Pitfall] Your mail server no longer works. See the configuration changes to the default sendmail configuration.
- [Pitfall] While performing an upgrade to Red Hat 7.1, the package to manage iptables (the firewall facility in the new kernel) was not included. You must manually include this facility by selecting the package. It seems that an upgrade looks at your configuration and upgrades the packages that you have installed on your system. The previous versions of Red Hat used kernel 2.2 which used ipchains and thus did not support iptables. Iptables were included for the first time in the kernel 2.4 used by Red Hat 7.1.
Check your installation by using the command: rpm -q iptables ipchains
Thus after the upgrade, manually install the RPM: rpm -ivh iptables-XXX.i386.rpm - [Pitfall] The upgrade created a new /etc/printcap.local file. The old /etc/printcap file was saved to /etc/printcap.save. This is a good thing as all references to printers except lp were deleted. The configuration tool /usr/bin/printtool is no longer used. The new tool is /usr/sbin/printconf-gui. (The 7.1 upgrade replaced printtool with a script which starts printconf-gui.) I'm confused as this new tool still uses the file /etc/printcap. I started the tool /usr/sbin/printconf-gui and then selected "File" + "Save Changes" to re-generate the /etc/printcap file. The man page for lpd suggests that the file /etc/printcap is indeed the proper configuration file for the lpd daemon. This file is constructed each time the lpd daemon is run, thus it is useless to edit this file. Use the GUI tool.
For more info see RH 7.1 manual: Printer Configuration - [Pitfall] The default upgrade to Gnome has mysteriously made the autohide feature of the toolbar useless. The autohide feature is turned on by a right-mouse-button-click on the Gnome toolbar + "Properties" + "Hiding policy" + "Auto hide". The toolbar will unhide but it is always displayed below other applications so it can't be seen or used.
To fix this stupid behavior:- Start the Gnome Control Center: select the toolbox on the toolbar.
- Select tree items (LHS) "Desktop" + subitem "Panel".
- Then select tab (RHS) "Miscellaneous"
- Un-select the button "Keep panel below windows (GNOME compliant window managers only)"
- Complete this action by selecting "Ok".
- [Pitfall] Reducing system overhead: While performing an upgrade, the installation will add some packages to your init procedure even if it was not included in the init process previously. The installation assumes that if it is installed, you want to use it. To clean this up use the chkconfig command: i.e. chkconfig --del sshd (server daemon which allows remote login) and chkconfig --del sendmail (mail server). I performed this on my workstation to disable FreeWnn (Kana-to-Kanji conversion system. That's what I get for installing everything!!), pppoe (point to point over ethernet), medusa, nfslock (I'm not running NFS), netfs (mounts NFS and SMB), autofs (NFS) and portmap (RPC's used by NFS). One can also use the GUI tool /usr/sbin/ntsysv.In the end my workstation runs init scripts crond, anacron, atd, crond, gpm, keytable, kudzu, lpd, network, portsentry (my add-on - not typical), random, rawdevices, reconfig, syslog, xfs, iptables, autofs and xinetd upon system boot. My server on the other hand runs a whole lot more and omits the font server xfs. Your choices will be based upon your requirements.
Tripwire is a great file system monitoring tool for a server but really un-necessary for a dial-up PPP system or a system which is rarely connected to the internet. It is used to detect file changes by hackers. The default is to use cron to run tripwire every day. This behavior can be changed to run tripwire weekly or monthly by moving the script /etc/cron.daily/tripwire-check to the /etc/cron.weekly/ directory. - [Note and Pitfall] The inetd daemon and the configuration file /etc/inetd.conf has been replaced by xinetd which uses files located in the directory /etc/xinetd.d/. Xinetd has access control mechanisms, logging capabilities, the ability to make services available based on time, and can place limits on the number of servers that can be started, etc... and thus a worthy upgrade from inetd.
For more info on xinetd see the YoLinux.com Networking Tutorial.The pitfall: The services are all disabled upon install. I found that the wu-ftpd default was that the service was turned off.
To turn on the FTP service:- Edit the file /etc/xinetd.d/wu-ftpd and change the line:disable = yes to
disable = no Then restart the daemon: /etc/rc.d/init.d/xinetd restart.
OR - Use the command: chconfig wu-ftpd on
This command will also restart the xinetd process to pick up the new configuration.
The ftp server is now available. - Edit the file /etc/xinetd.d/wu-ftpd and change the line:disable = yes to
- [Note and Pitfall] The locations of some the applications have changed with release 7.1. If you have created a launcher icon and hard-coded the full path name, it may not work. I noticed that xpaint moved from /usr/X11R6/bin/ to /usr/bin/ and some of my network utilities moved from /usr/sbin/ to /usr/bin/.
- [Pitfall] Linux now supports more APM features, but that is both good and bad. APM (Advanced Power Management) is good for laptops but often bad for desktops as the hardware may support it poorly. APM controls screen blanking and power saving features required by laptops. On the desktop it has been a source of many random lock-ups I experienced just after or near the end of the boot sequence. I STRONGLY recommend that you boot and enter your bios and turn off all APM features. You may just find that boot reliability goes from flaky to flawless.
- Install: RH 7.0:
- [Pitfall] Sendmail hangs for a while before allowing Linux to complete the boot process. This is often due to the fact that you have given your computer a name but it is unknown to the networking software on your system. Add the computer name to the /etc/hosts file.
127.0.0.1 <put-your-computer-name-here> localhost
The host name is often assigned during install and can be found in the /etc/HOSTNAME file. It can be assigned/re-assigned using the hostname command or by using the GUI admin tool "/bin/linuxconf". (Note that linuxconf is no longer included with Red Hat Linux 7.3+)
Note that there may be NO blank spaces in the host name.
- [Pitfall] Sendmail hangs for a while before allowing Linux to complete the boot process. This is often due to the fact that you have given your computer a name but it is unknown to the networking software on your system. Add the computer name to the /etc/hosts file.
- Install: RH 6.2, 7.0:
- [Pitfall] Apache fails due to an improper configuration file option. Edit file /etc/httpd/conf/httpd.conf. Uncomment the line:
ServerName localhost
by removing the "#" at the beginning of the line.
- [Pitfall] Apache fails due to an improper configuration file option. Edit file /etc/httpd/conf/httpd.conf. Uncomment the line:
- Install: RH 6.2:
- [Pitfall] Desktop application launching icons (GMC) may fail due to an update in their format.
Edit the files in $HOME/.gnome-desktop/.desktop so that the line:
Name=<application>
is changed to:
Name[en_US.ISO8859-1]=<application>
Then right click on the desktop and select "Rescan Desktop Directory". - [Pitfall] For a more robust desktop, change the default window manager from "Enlightenment" to "Sawmill". After about three days of heavy desktop use, "Enlightenment" will start to get flaky.
Note: Red Hat 7.0 makes Sawfish (the current version of Sawmill) the default window manager. They must have had a similar experience.
- [Pitfall] Desktop application launching icons (GMC) may fail due to an update in their format.
- Upgrade: RH 6.1:
- [Pitfall] The SAMBA upgrade was incomplete. The /etc/sb.conf file gets backed up as /etc/smb.conf.rpmsave but a new samba configuration file (smb.conf) was not generated. Copy the smb.conf.rpmsave to smb.conf.
- [Pitfall] Fix for SAMBA if it is not initiated upon boot.
chkconfig --level 345 smb on - [Pitfall] Printing or serial ports ignored: Add the following line to the file /etc/conf.modules:
alias parport_lowlevel parport_pc
This configures the kernel upon system boot to auto-detect and configure system serial ports. This may also effect modem use.
Note: Newer kernels such as 2.2.17 use /etc/modules.conf.
- Upgrade: RH 5.2 to 6.0:
- [Pitfall] The RH 6.0 installation/upgrade manual states the following but will cause X-windows to fail. Don't do it. The upgrade will not touch your video settings held in /etc/X11/XF86Config. In order to use the new font server add the following line:
FontPath tcp/localhost:7100"
Next set the system configuration to run the font server at boot time: /sbin/chkconfig --add xfs
Note: you can add or remove any system services to be started (at boot time) in this manner. - [Pitfall] RH 6.0 upgrade - I added everything for my upgrade. The news server and server for plan calendars were not configured and caused errors upon boot thus slowing the boot process.
To remedy the situation: chkconfig --del innd and chkconfig --del netplan
This removes the background daemons/services from the system boot process.
- [Pitfall] The RH 6.0 installation/upgrade manual states the following but will cause X-windows to fail. Don't do it. The upgrade will not touch your video settings held in /etc/X11/XF86Config. In order to use the new font server add the following line:
Release Updates and fixes: After a successful installation or update, it is wise to check the Red Hat web site for updates to the CD release. See: http://www.redhat.com/security/updates/.
You can also directly download update RPM's using FTP:
-
[root prompt]# ftp updates.redhat.com
Connected to updates.redhat.com.
220 Red Hat FTP server ready. All transfers are logged.
...
Name (updates.redhat.com:ipp): anonymous
Password:                      -Enter your email address
230- THE SOFTWARE AVAILABLE FROM THIS SITE IS PROVIDED AND LICENSED
230- "AS IS" WITHOUT WARRANTY OF ANY KIND, EITHER EXPRESSED OR
230- IMPLIED, INCLUDING, BUT NOT LIMITED TO, THE IMPLIED WARRANTIES
230- OF MERCHANTABILITY AND FITNESS FOR A PARTICULAR PURPOSE.
230 Login successful. Have fun.
Remote system type is UNIX.
Using binary mode to transfer files.
ftp> cd 7.3/en/os/i386/
250 Directory successfully changed.
ftp> prompt
ftp> mget apache*       -Example: download apache upgrades
ftp> bye
221 Goodbye.
[root prompt]#
| System Re-Configuration: (Must be root) |
During the Red Hat installation process, a series of configuration tools were used to configure the mouse, keyboard, video etc. These can be run separately at any time after the installation. Use the following commands to re-configure the system for new or replaced hardware devices or to correct inappropriate settings.
Device Linux Configuration Tool System Configuration
All: keyboard, mouse, .../usr/bin/system-config-item-to-configure (FC 2/3)
/usr/bin/redhat-config-item-to-configure (RH 8.0/9.0/FC1 - see below)
/usr/sbin/setupVideo card,monitor /usr/bin/system-config-display (FC 2/3)
redhat-config-xfree86 (Red Hat 8.0/9.0)
/usr/bin/X11/Xconfigurator (Red Hat 6.x,7.x)
/usr/X11R6/bin/xf86config (From XFree86.org)Keyboard /usr/bin/system-config-keyboard (FC 2/3)
/usr/bin/redhat-config-keyboard (RH 8.0/9.0/FC1)
/usr/sbin/kdbconfigGnome Desktop Keyboard Properties /usr/bin/gnome-accessibility-keyboard-properties (RH 9.0, FC 2/3) Gnome Desktop Keybinding Properties /usr/bin/gnome-keybinding-properties (RH 9.0, FC 2/3) Mouse /usr/bin/system-config-mouse (FC 2/3)
/usr/bin/redhat-config-mouse (RH 8/9/FC1)
/usr/sbin/mouseconfig (Removed in RH 9.0)
Which Red Hat genius devised a mouse configuration tool which requires a mouse!!! They really need to bring back a console based mouse configuration tool.Date / Time / Time zone /usr/bin/system-config-data (FC 2/3)
/usr/bin/redhat-config-date (RH 8.0/9.0/FC1)
dateconfig (RH 7.2)
/usr/sbin/timeconfig (Pre 7.2)Sound Card /usr/bin/system-config-soundcard (FC 2/3)
/usr/bin/redhat-config-soundcard (RH 8.0/9.0 - test only)
/usr/sbin/sndconfig (still used in 8.0)Network Card /usr/bin/system-config-network (FC 2/3)
/usr/bin/redhat-config-network (/usr/bin/neat) (RH 7.2+)
/usr/bin/redhat-config-network-tui (text console RH 9.0)
/usr/sbin/netconfig (console. First interface only - eth0)
/usr/bin/netcfg (GUI) (no longer available with RH 7.2)
/usr/bin/redhat-control-network (Start/Stop network interfaces RH 9.0)
redhat-config-network-druid (Configure CIPE,Ethernet,modem,token Ring,Wireless or DSL)System services
(processes started at boot)/usr/bin/system-config-services (FC 2/3)
/usr/bin/redhat-config-services (RH 8.0/9.0, FC1)
serviceconf (RH 7.2)
/usr/sbin/ntsysv
/usr/X11R6/bin/tksysv (GUI)System Start /usr/bin/system-config-kickstart (FC 2/3)
/usr/bin/redhat-kickstart (RH 8.0 only)Printer /usr/bin/system-config-printer (FC 2/3)
/usr/bin/redhat-config-printer (RH 8.0/9.0, FC1) Configures lpd service. Modifies /etc/printcap file.
/usr/bin/redhat-config-printer-gui (RH 8.0/9.0, FC1) (Exact same as above)
/usr/bin/printtool (Also the exact same as above)
Red Hat 7.1: /usr/sbin/printconf-gui (Yes, in RH 8.0+ this is also the exact same as above)
/usr/sbin/printconf-gui (Was a text mode tool introduced with Red Hat 7.2 In RH 8.0+ it is the same as above)/usr/bin/redhat-switch-printer (RH 8.0+) Choose printing service: lpd or CUPS
(Can also set environment variable to set default printer: export PRINTER="lpHP")RH 7.1: System security.
Choose and configure NIS, LDAP or Hesiod for authentication./usr/bin/system-config-authentication (FC 2/3)
/usr/bin/authconfig-gtk (RH 8.0)
/usr/sbin/authconfig (console tool)RH 8.0+: System security. Firewall configuration.
Note this will configure your system to use iptables./usr/bin/system-config-securitylevel (FC 2/3)
/usr/bin/redhat-config-securitylevelRH 7.1: System security. Firewall configuration.
Note this will configure your system to use ipchains and NOT iptables./usr/sbin/lokkit
/usr/sbin/gnome-lokkitSystem Management /bin/linuxconf
(No longer included with Red Hat 7.3+)Make an Emergency/Recover boot floppy /sbin/mkbootdisk 2.2.16-3
(Enter release of kernel.
See directory /boot)users/groups /usr/bin/system-config-users (FC 2/3)
/usr/bin/redhat-config-usersSet/Change Root Password /usr/bin/system-config-rootpassword (FC 2/3)
/usr/bin/redhat-config-rootpassword (RH 8.0/9.0, FC1)System Log File Viewer
Scan, search boot, cron, kernel start logs, mail, mysql, rpm (current list of all packages installed), security, system, XFree86,... logs/usr/bin/redhat-logviewer (RH 8.0+) System Proc Files
(Kernel tuning parameters. You need to know what your are doing here!!)/usr/bin/redhat-config-proc (RH 8.0+) Package Manager - Add/Remove application/service packages /usr/bin/system-config-packages (FC 2/3)
/usr/bin/redhat-config-packages (RH 8.0/9.0, FC1)Desktop Switching Tool /usr/bin/switchdesk-gnome (RH 8.0+)
/usr/bin/switchdesk (Same tool as above)
Can choose Gnome, KDE, TWM. Choose TWM for sparse lightweight desktop.
Red Hat Linux Server Services Configuration:
Server Service Linux Configuration Tool httpd Apache Web Server Configuration /usr/bin/system-config-httpd (FC 2/3)
/usr/bin/redhat-config-httpd (RH 8.0/9.0, FC1)named DNS Bind /usr/bin/system-config-bind (FC 2/3)
/usr/bin/redhat-config-bind (RH 8.0/9.0, FC1)nfsd NFS File Server /usr/bin/system-config-nfs (FC 2/3)
/usr/bin/redhat-config-nfs (RH 8.0/9.0, FC1)SMTP Mail /usr/bin/system-switch-mail (FC 2/3)
/usr/bin/redhat-switch-mail (RH 9.0, FC1)
/usr/bin/redhat-switch-mail-nox
/usr/bin/redhat-config-switchmail (RH 8.0+)
/usr/bin/redhat-config-switchmail-gnome
| Adding and Removing Installation Packages: |
For adding or removing software packages see the YoLinux.com system administration guide on Red Hat Package Manager (RPM)
To Add or remove packages or entire package groups offered during installation, use the GUI tool /usr/sbin/system-config-packages:
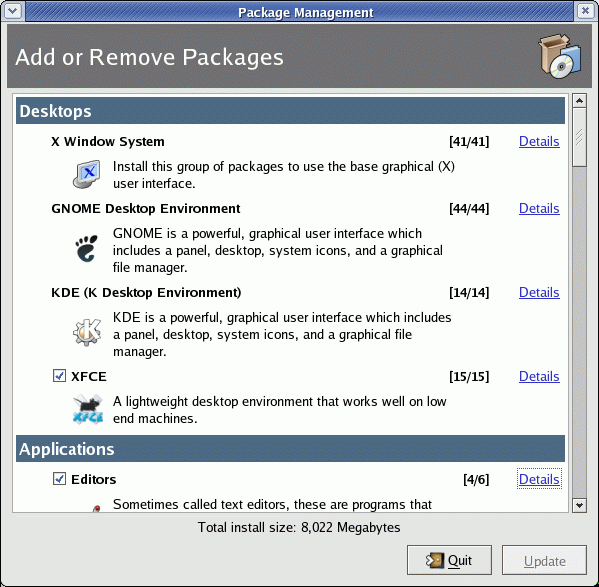
Select the "Details" link to see all the RPM packages associated with the group:
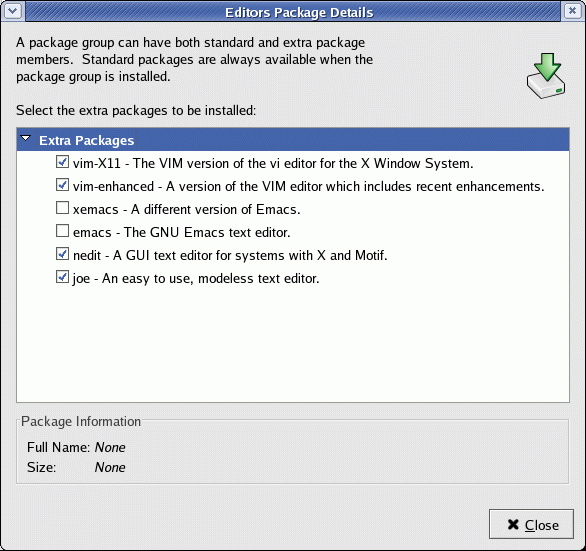
Check the box so RPM will install the Linux program. Installing Linux programs is that easy!
| Cloning The Drive To Duplicating The Installation: |
| Basic System Administration: |
Editing files:
- Many editors come with the basic Linux install. Basic console text editors include jed, joe, pico, emacs and vi. (Listed from easiest to most difficult to master) GUI X-window editors (which may be used after X-Windows has started - using the startx command or init level 5) include gedit (Gnome/RH8.0 default), gnp (gnotepad), nedit, editor, edit and xemacs. These editors may be invoked from the command line or from the desktop tollbar. Man pages should be available for the editors. By far the easiest to use is gedit. ("Toolbar Start Icon" + "Accessories" + "Text Editor+")
Linux command shell mode:
- By default, when you first log in, the system is in the UNIX command shell mode. After X-windows is started, the GNOME desktop will offer you a command shell by selecting the computer terminal icon on the toollbar. (RH5.2 puts a shell on your desktop by default.) The default shell is bash. For more information type: man bash .
Information, documentation and help:
- Documentation can be found locally in /usr/doc/. (also/usr/doc/HOWTO/) It is easiest to view this with Netscape.
Beginning with Red Hat 7.1 the documentation is located in directory /usr/share/doc/ - Many commands have a simple help facility built in. Try the --help option. For example try cat --help, ls --help or even man --help.
- Information on a Linux subject or on individual commands is available with the UNIX "man" command. To find commands which refer to a subject, enter man -k <subject>. To view a Linux manual page on a particular command, enter man <UNIX command> . The pages scroll using Page Up/Down keys and arrow keys. To exit type the letter q . Use the command man man for more information.
- /etc/cron.weekly/makewhatis.cron : This sets up manual page index for man -k subject help facility.
It is recommended that after installation that you execute the script to configure the database rather than wait a week for it to execute automatically. Issue the command (as root): /etc/cron.weekly/makewhatis.cron - /etc/cron.daily/updatedb.cron : Sets up index for locate command. (Creates data file /var/lib/locatedb)
Security and permissions:
- UNIX controls file, directory and device access by user id and group membership. File, directory and device permissions may be granted or denied for reading (r), writing (w) and executing (x). These permissions may be granted to a specific user (u), group (g) or all other users (o). Directory listings can show this with letters representing permissions. For example: -rw-r--r-- which shows that the owner (user) has read and write privileges while the group members and all other users have read only privileges. The symbols display access privileges in the order of owner, group and other. Users are listed in the file /etc/passwd. Groups and group members are listed in the file /etc/group.See man pages:
Note on root id: The login id root is all powerful and should be used for system administration only. For regular user operation of the system, it is best to create a new user.
All users are a member of a group. New users will be added to a group of the same name as the user (each user had his own group). Membership in other groups may be added. This is often done to give a group of users access to a file or device which is accessible to all group members. See the tutorial on managing groups.
For a complete tutorial on protecting your system while connected to the internet, see the YoLinux.com Internet Security Tutorial.
Device access:
- Devices such as diskettes and CR-ROMs are often used by desktop users. It is common to have these devices owned by the groups floppy and cdrom respectively. The device permissions are set such that the device is accessible only by group members. To grant access to a device, add a user to the respective group. Unlike desktop systems, user access to these devices in a server environment is often not a good idea. See the YoLinux.com tutorial Managing Group Access.
Mounting a Windows partition:
- Use the command: mount -t vfat /dev/hda1 /mnt/C
Mount MS/windows partition with long filenames so Linux can look at it if Win95 is on your 1st partition on the first drive. Use option "-t umsdos" for DOS/Win 3.1partition. (i.e. On my SCSI based system: mount -t umsdos /dev/sda3 /mnt/C) This requires that one create the directory mount point first (mkdir /mnt/C ) This mount can be made permanent by making the following entry to the /etc/fstab file:/dev/hda1 /C vfat defaults 0 0
For more information see the man pages for mount, umount, fstab and dump.Note: The "umount" command is NOT "unmount". Notice the difference in spelling.- umount /mnt/C
Support for other file systems:
Partial list:
Filesystem Filesystem Description ext2 Linux msdos Basic Microsoft DOS umsdos DOS with ling file names and Linux extensions vfat Windows 95 iso9660 CD: Auto detects "High Sierra" and "Rock Ridge" hpfs OS/2 (Read only) sysv Commercial System V Unix nfs Network File System (remote mounts) smb Windows for workgroups, NT and LAN manager ncpfs Novel Netware NCP file system
Also see: fs man page.
Windows upgrade on a Dual Boot system:
- Create a Linux boot disk.
- Re-write the DOS boot loader onto the hard drive: fdisk /mbr
- Upgrade Windows.
- Boot system with Linux boot disk.
- Run /sbin/lilo -v to re-install Linux boot loader onto hard drive.
or
/sbin/grub-install (Grub was introduced in Red Hat 7.2)
Setting graphical Login screen as default:
- This may be configured during installation but can be changed. Do this only after X-windows is properly configured to the proper resolution. Init level 3 will boot the system to a console mode. Edit file /etc/inittab and change the following entry id:3:initdefault: to id:5:initdefault: . This will start X-windows upon boot-up by default without having to initiate it manually with the startx command.
Desktop choices:
- The basic choices are GNOME (default), KDE and FVWM2 (default for RH 5.2 and earlier. Also called Another Level). You may choose a different desktop by selecting from the Start or selection menu, "System" + "Desktop Switching Tool" . Other desktop GUIs available on the system include AfterStep (clone of the NextStep interface), WindowMaker, FVWM95 (also a clone of the Windows 95/NT 4.0 interface) and MWM (Motif Window Manager based on Open Source Lesstif).Tip: Gnome toolbar help on Red Hat 7.1 - right-mouse-click within the toolbar + "Panel" + "Panel manual".
[Potential Pitfall]: RH 6.1 has a slight bug in that it allows you to select the Win 95 interface (FVWM2) but you cant get back. The selection process is controlled by your $HOME/.Xclients script which calls .Xclient-$HOSTNAME:0 or .Xclients-default file. Use one of the following entries in your .Xclients-default file to restore your configuration:- exec gnome-session
- exec startkde
FVWM2 uses a script rather than a single line command.
Minimal desktop graphics for limited resources:
- If your system is slow and limited you can still run a graphical desktop, just not Gnome or KDE. Boot to init level 3 (console only not init level 5 with graphics) and issue the following commands:
- Start X-Windows: xinit
- Start a very lean window manager: mwm
Use the right mouse button to bring up a menu.
Soft Paws:
- Left Handed users might want to use the mouse on the opposite side. To revers the mouse button order, issue the command:
gpm -B 321
CD player:
- Red Hat 8.0:
/usr/bin/gnome-cd
- Red Hat 6.x, 7.x:
/usr/bin/gtcd: "Start" + "Programs" + "Multimedia" + "CD Player"To use a free CDDB internet database set the server to: freedb.freedb.org port 8880- Red Hat 8.0:
X-Window scripts:
- The X-Window initialization script is /etc/X11/xinit/xinitrc. The user script is ~/.xinit. Programs you wish to autostart should be placed in your xinit script. The desktop system you choose will probably also have a script as well. For KDE see ~/.kde/Autostart.See X-Window User HOWTO for more information.
Adding an application to the start menus:
- "Gnome start button" + "Settings" + "Menu Editor". You will have to be root to add to system menus.
User menus unique to the login account are held in $HOME/.gnome/apps/<application>.desktop
Apache Web server (httpd):
- Fedora Core 1/2/3 and Red Hat 7.x/8.0/9.0 file locations:
   /var/www/html/          - Web pages go here. Home page is index.html
            icons/         - Graphical icons used by the server
            cgi-bin/       - Location for CGI programs

   /var/log/httpd/access_log  - Server log files
                  error_log
Red Hat 6.x and earlier file locations:/home/httpd/html/ - Web pages go here. Home page is index.html
icons/ - Graphical icons used by the server
cgi-bin/ - Location for CGI programs
/var/log/httpd/access_log - Server log files
error_log
See httpd man page.
See Apache online manual
YoLinux.com Web site configuration tutorial
RPM - Red Hat Package Manager:
- The rpm command is used to manage software applications and system modules. See the YoLinux.com Admin Tutorial - rpm
Linux devices:
- If you are missing a device: (i.e. /dev/radio)
     cd /dev
     ./MAKEDEV radio
Something Cool:
- Slide Show:
- Put a bunch of JPEG files in a directory (i.e. develop photos and get the "Kodak Picture CD")
- Start photo viewer application:
- RH 8.0: Start GQview - (/usr/bin/gqview) or GUI desktop select the "start icon" + "Graphics" + "GQview".)
- Open the folder/directory where the photos reside.
- Select "Edit Options"
- Tab "General": Select "Repeat" and choose delay in seconds.
- Tab "Image": Select "Fit image to window" and "Expand images for zoom to fit"
- Select "View" + "Toggle Slide Show"
- Select "View" + "Full Screen"
OR - RH 7.x: Start Gtk-See (/usr/bin/gtksee or select "The paw/start icon" + "Programs" + "Graphics" + "Gtk-See".)
- Open the folder/directory where the photos reside.
- Select "Tools" + "Slide Show" or ctrl-S
- Select the "Full Screen" icon.
- RH 8.0: Start GQview - (/usr/bin/gqview) or GUI desktop select the "start icon" + "Graphics" + "GQview".)
- Use the right mouse button to bring up a menu.
- Enjoy!
Admin Tutorials:
- YoLinux.com Tutorials:
- Init process tutorial - Tutorial on how to add/remove background processes/services which start on system boot-up.
- Managing Group Access - Granting and administering file and device access.
- System Administration
- File System Quotas - Limiting a user's disk usage.
- Netscape Configuration and plug-ins
- Networking
- Set up Linux as an internet gateway for home or office
- Internet Web Server and Domain Configuration
- Configuring a Linux workstation for interoperability with the MS/Windows environment
- List of all YoLinux.com tutorials
Links:- Configuration HOWTO - Guido Gonzato
- Bash Prompt HOWTO - Giles Orr
- Linux Printing HOWTO - Grant Taylor
- Text-Terminal-HOWTO - David S. Lawyer
| Linux Installation Related Links: |
- Dual boot Linux with Win2k
- Linux Installation HOWTO - Eric S. Raymond
- PLIP Install HOWTO - Install over the network - Gilles Lamiral
- Unix and Internet Fundamentals HOWTO - Eric S. Raymond (for beginners)
- Linux BootPrompt-HowTo - Paul Gortmaker
- Linux Bootdisk HOWTO - Tom Fawcett
- Multi Disk System Tuning - How best to use multiple disks and partitions - Stein Gjoen
- Linux Large Disk HOWTO - Andries Brouwer
- Filesystems HOWTO - Martin Hinner
- Diskless Nodes HOW-TO - Robert Nemkin, Al Vasudevan, Markus Gutschke, Ken Yap, Gero Kuhlmann
- Root over nfs clients and server Howto - Hans de Goede
- Managing Multiple Operating Systems HOWTO - Robert W. Schultz
- Keyboards - 104 or 101 keys - Settings
- Linux Busmouse HOWTO - Chris Bagwell
- Linux Hardware Compatibility HOWTO - Patrick Reijnen
- Linux Plug-and-Play-HOWTO - David S.Lawyer
- Linux XFree86 HOWTO - V 4 - Eric S. Raymond
- Linux Touch Screen HOWTO - Christoph Baumann
- XFree86 Video Timings HOWTO - Eric S. Raymond
- USB Device Guide
Laptop Guides:
- Linux Laptop HOWTO - Werner Heuser
- Linux PCMCIA HOWTO - David Hinds
Red Hat Installation Guide:
- RH 7.1 Install Guide
- RH 7.0 Install Guide i386 - [Alpha]
- RH 6.2 Install Guide i386 - [Alpha/SPARC]
- RH 6.1 Install Guide
Installation guides for other distributions:
- Ubuntu
- Debian GNU:
- Installation Guide
- Installation Instructions for all hardware platforms and all languages
- Debian FAQ
- Mandriva: (was named Mandrake)
- Slackware:
- S.u.S.E.:
 Books: Books: |
 | "Fedora 10 and Red Hat Enterprise Linux Bible" by Christopher Negus Wiley, ISBN# 0470413395 |  |
 | "Red Hat Fedora 6 and Enterprise Linux Bible" by Christopher Negus Sams, ISBN# 047008278X | |
 | "Fedora 7 & Red Hat Enterprise Linux: The Complete Reference" by Richard Petersen Sams, ISBN# 0071486429 | |
 | "Red Hat Fedora Core 6 Unleashed" by Paul Hudson, Andrew Hudson Sams, ISBN# 0672329298 | |
 | "Red Hat Linux Fedora 3 Unleashed" by Bill Ball, Hoyt Duff Sams, ISBN# 0672327082 | |
 | "Red Hat Linux 9 Unleashed" by Bill Ball, Hoyt Duff Sams, ISBN# 0672325888I have the Red Hat 6 version and I have found it to be very helpful. I have found it to be way more complete than the other Linux books. It is the most complete general Linux book in publication. While other books in the "Unleashed" series have disapointed me, this book is the best out there. | |
 | "Red Hat Linux 9 (Visual QuickPro Guide)" by Harold Davis ISBN #032121918X, Peachpit Press, Addison WesleyThe best basic Linux book around for the GUI generation. This book can be best described as a guide to using the GUI configuration tools. | |
 | "Linux! I Didn't Know You Could Do That.." by Nicholas D. Wells ISBN #0782129358, SYBEX Inc.This book covers Linux applications from games and multimedia to networking tools. This book covers what the others don't. | |
 | "Red Hat Linux 9 Professional Secrets" by Naba Barkakati ISBN #0764541331, John Wiley and Sons |
No comments:
Post a Comment